
Reach the research unit on burials by clicking on the button "Burials"in the left-hand part of the consultation window.
At the top right-hand part, you will see a research unit taking the following form :
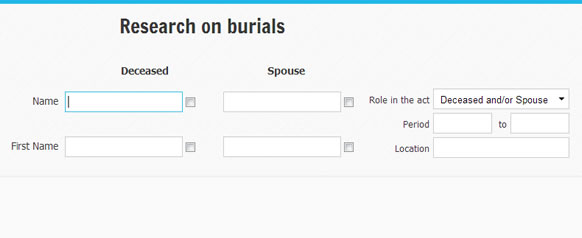
One can see that the research unit contains not less than 8 fields which you can use to carry out your research.
The fields "Surname" and "First name" of the deceased are used to enter information leading to the records you seek. As indicated previously you can use wild characters in these fields. (see research rules)
As the research system assumes automatically that there is a character "%" at the end of the field, it will seek any surname beginning with the typed characters, if you wish to carry out a research starting from the exact word, you can check the box located at the right-hand side of the field. The system will then eliminate the wild characters mechanism, and will carry out its research on the exact spelling entered.
You can also specify the period for which you are seeking information by entering the beginning and ending years of the period for which you are searching information by filling in the two boxes "Period" with the first and last year of the desired period. You can also indicate to search from a given year up to now by filling only the first box with the beginning year. You can as well start the research from the beginning up to a given year by filling only the second box.
If you wish to limit your research to a particular locality, you can enter its name in the box "Locality". Here again, you can use wild characters where you are uncertain of the exact spelling or want several choices. For example: by putting the letters "St-" in the field, the system will turn over all the localities where one could find these three letters in this order : “St-“.
Remember that two of the fields must contain at least two characters and that one of those fields must be a surname, the second one being either a surname, a given name or a location. For example, to see if some "Meloche" were buried in "Terrebonne", type "Meloche" in the "Name" field and "Terrebonne" in the "Location" field
Where the tool can prove itself to be exceptional, it is in the research of the children of a couple or even of a person. You will notice that the box "Role in the act" contains three choices. We have just seen the first : “Deceased”. Let us see the two others now.
You can choose to carry out your research starting from the name of the spouse, the father or the mother of the deceased person. If you start with the names of the parents, a new research window will pop up :
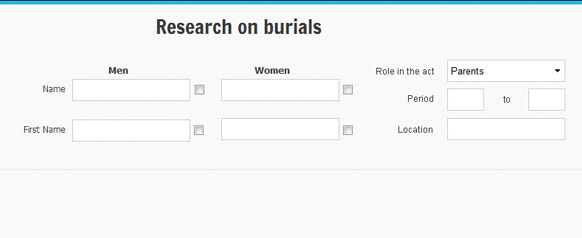
You will notice that fields were added to this window in order to allow the research starting from the father / mother of the deceased person. Remember to observe the choice in the box "Role in the act" for pointing out clearly the object of your research.
You can request information using the name of the man, of the woman or both.
Results of your research
The results of your research appear in a list located at the bottom of the research unit in a section which we will name "List of the results". This list, produced by our server from information you entered in the research module, enables you to select the records you believe could answer your needs. To ease this task, clicking a column title will sort the list according to that column. An arrow in the column title marks the selected column as well as the sort direction.
Note that the results are limited to 500 entries. If research exceeds this number, the first 500 results will be posted. Refine your search criteria to obtain a shorter list.
Please note that, for saving space, the name of the locality was truncated. But you can visualize the complete name by positioning the cursor on the name of the locality. The complete name appears in a dedicated information box.
If you wish to visualize the actual complete record, you simply have to click on any information on this line.
The complete record appears in a new window. It is only at this moment that your account is debited of one voucher.
Sepulture record
The record gives you all the information contained in the database. You will find, at the bottom right-hand side of each certificate, three buttons :
- Retain this record - Adds this record to the printing buffer for future printing.
- Correction - To report to BMS2000 a perceived error in the record.
- Close - To close the record window and resume your research.
You can see the power of the research tools to browse information on the site. With time, you will become more efficient in your research.